Windows Power Plan Management
Use Quick CPU to Customize and Manage Power Plan on Windows System
Table of Contents
Power Plan Settings
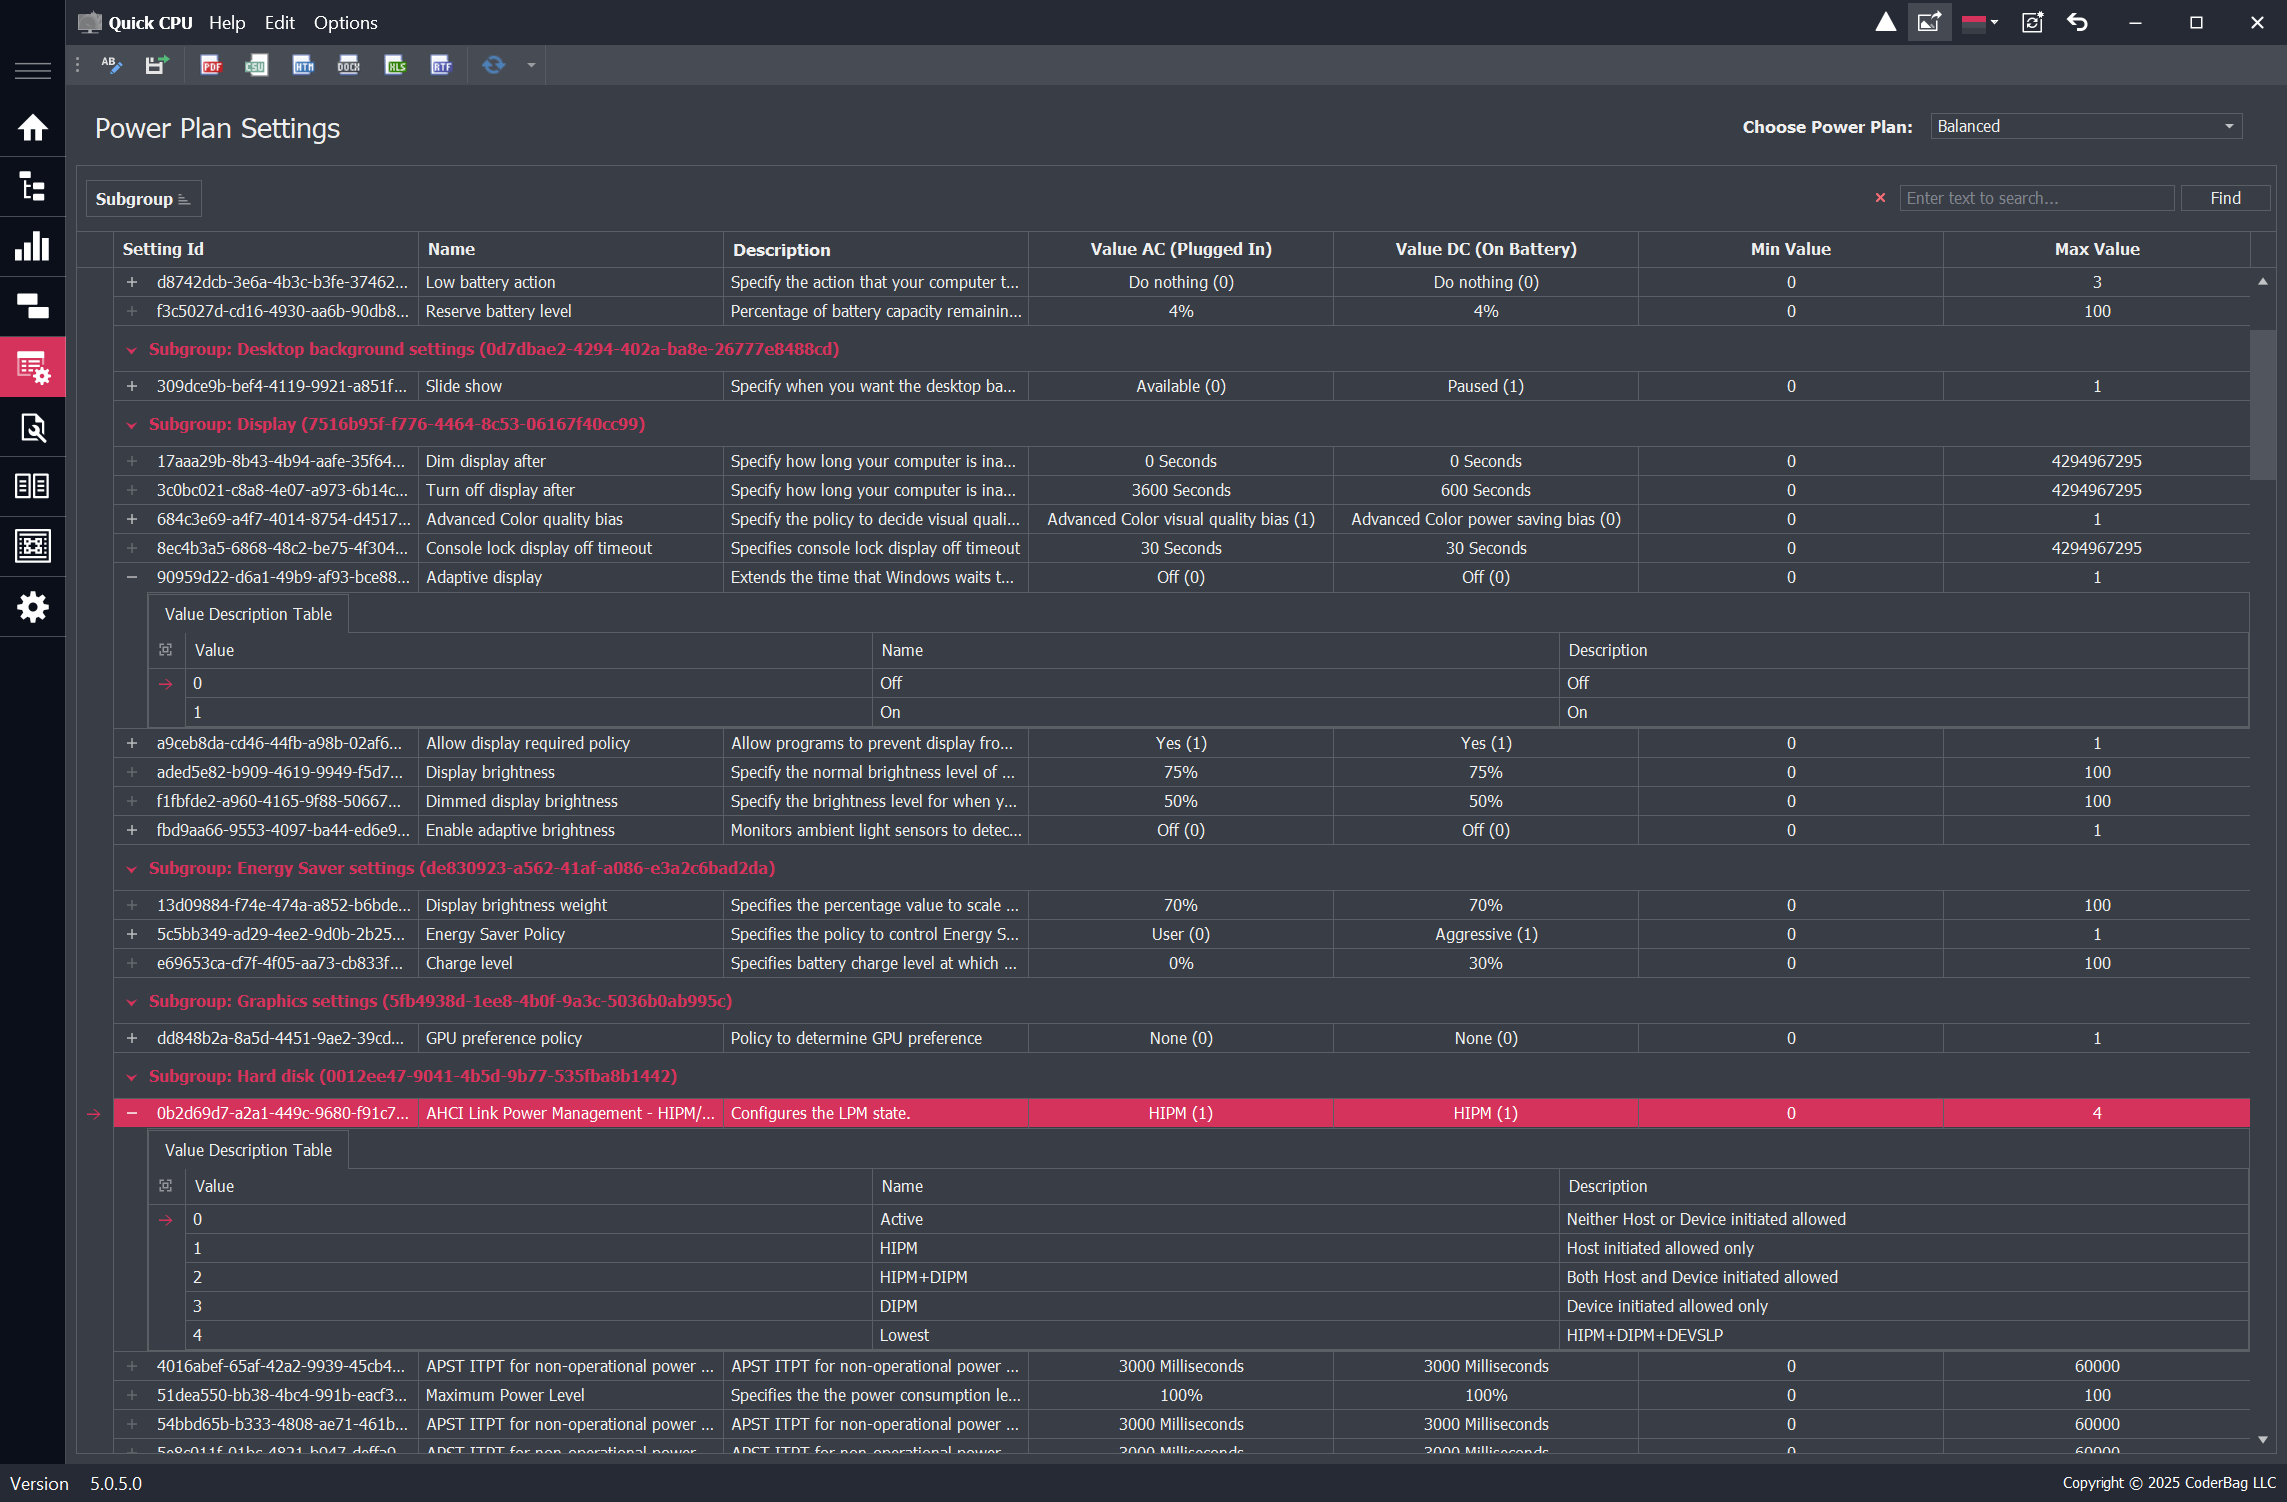
The Power Plan Settings control in Quick CPU provides a comprehensive interface for viewing and modifying power-related settings for a selected power plan. This control groups settings into categories and allows users to edit values for both AC (plugged-in) and DC (battery) modes.
Features
- Power Plan Selection: Users can choose a power plan from the dropdown list labeled Choose Power Plan located on the right side of the interface.
- Expandable Setting Rows: Each power setting is represented by a row with a plus sign (+) on the left side. Expanding the row reveals the Value Description Table, which explains possible values for the setting.
- Numerical Settings: If the plus sign is greyed out, the setting uses numerical values without descriptive options.
- Search Functionality: A search box below the power plan dropdown allows users to find specific settings by entering text.
- Export Options: Users can export all power plan settings in various formats, including PDF, CSV, DOCX, RTF, XLSX, and HTML.
Editing Power Settings
Double-clicking any power setting row opens the Edit Power Setting dialog, where users can:
- Modify the Name and Description of the setting.
- Adjust Value AC (Plugged In) and Value DC (On Battery).
- View the Min and Max values allowed for the setting.
- Compare the same setting values across different power plans available on the user's computer.
Usage
Users can utilize this control to fine-tune power management settings, optimize battery life, and configure system performance behaviors under different power states.
Example
For example, a user can change the Advanced Color Quality Bias setting to prioritize either power saving or high-quality visuals, depending on the power source.
Power Plan Management
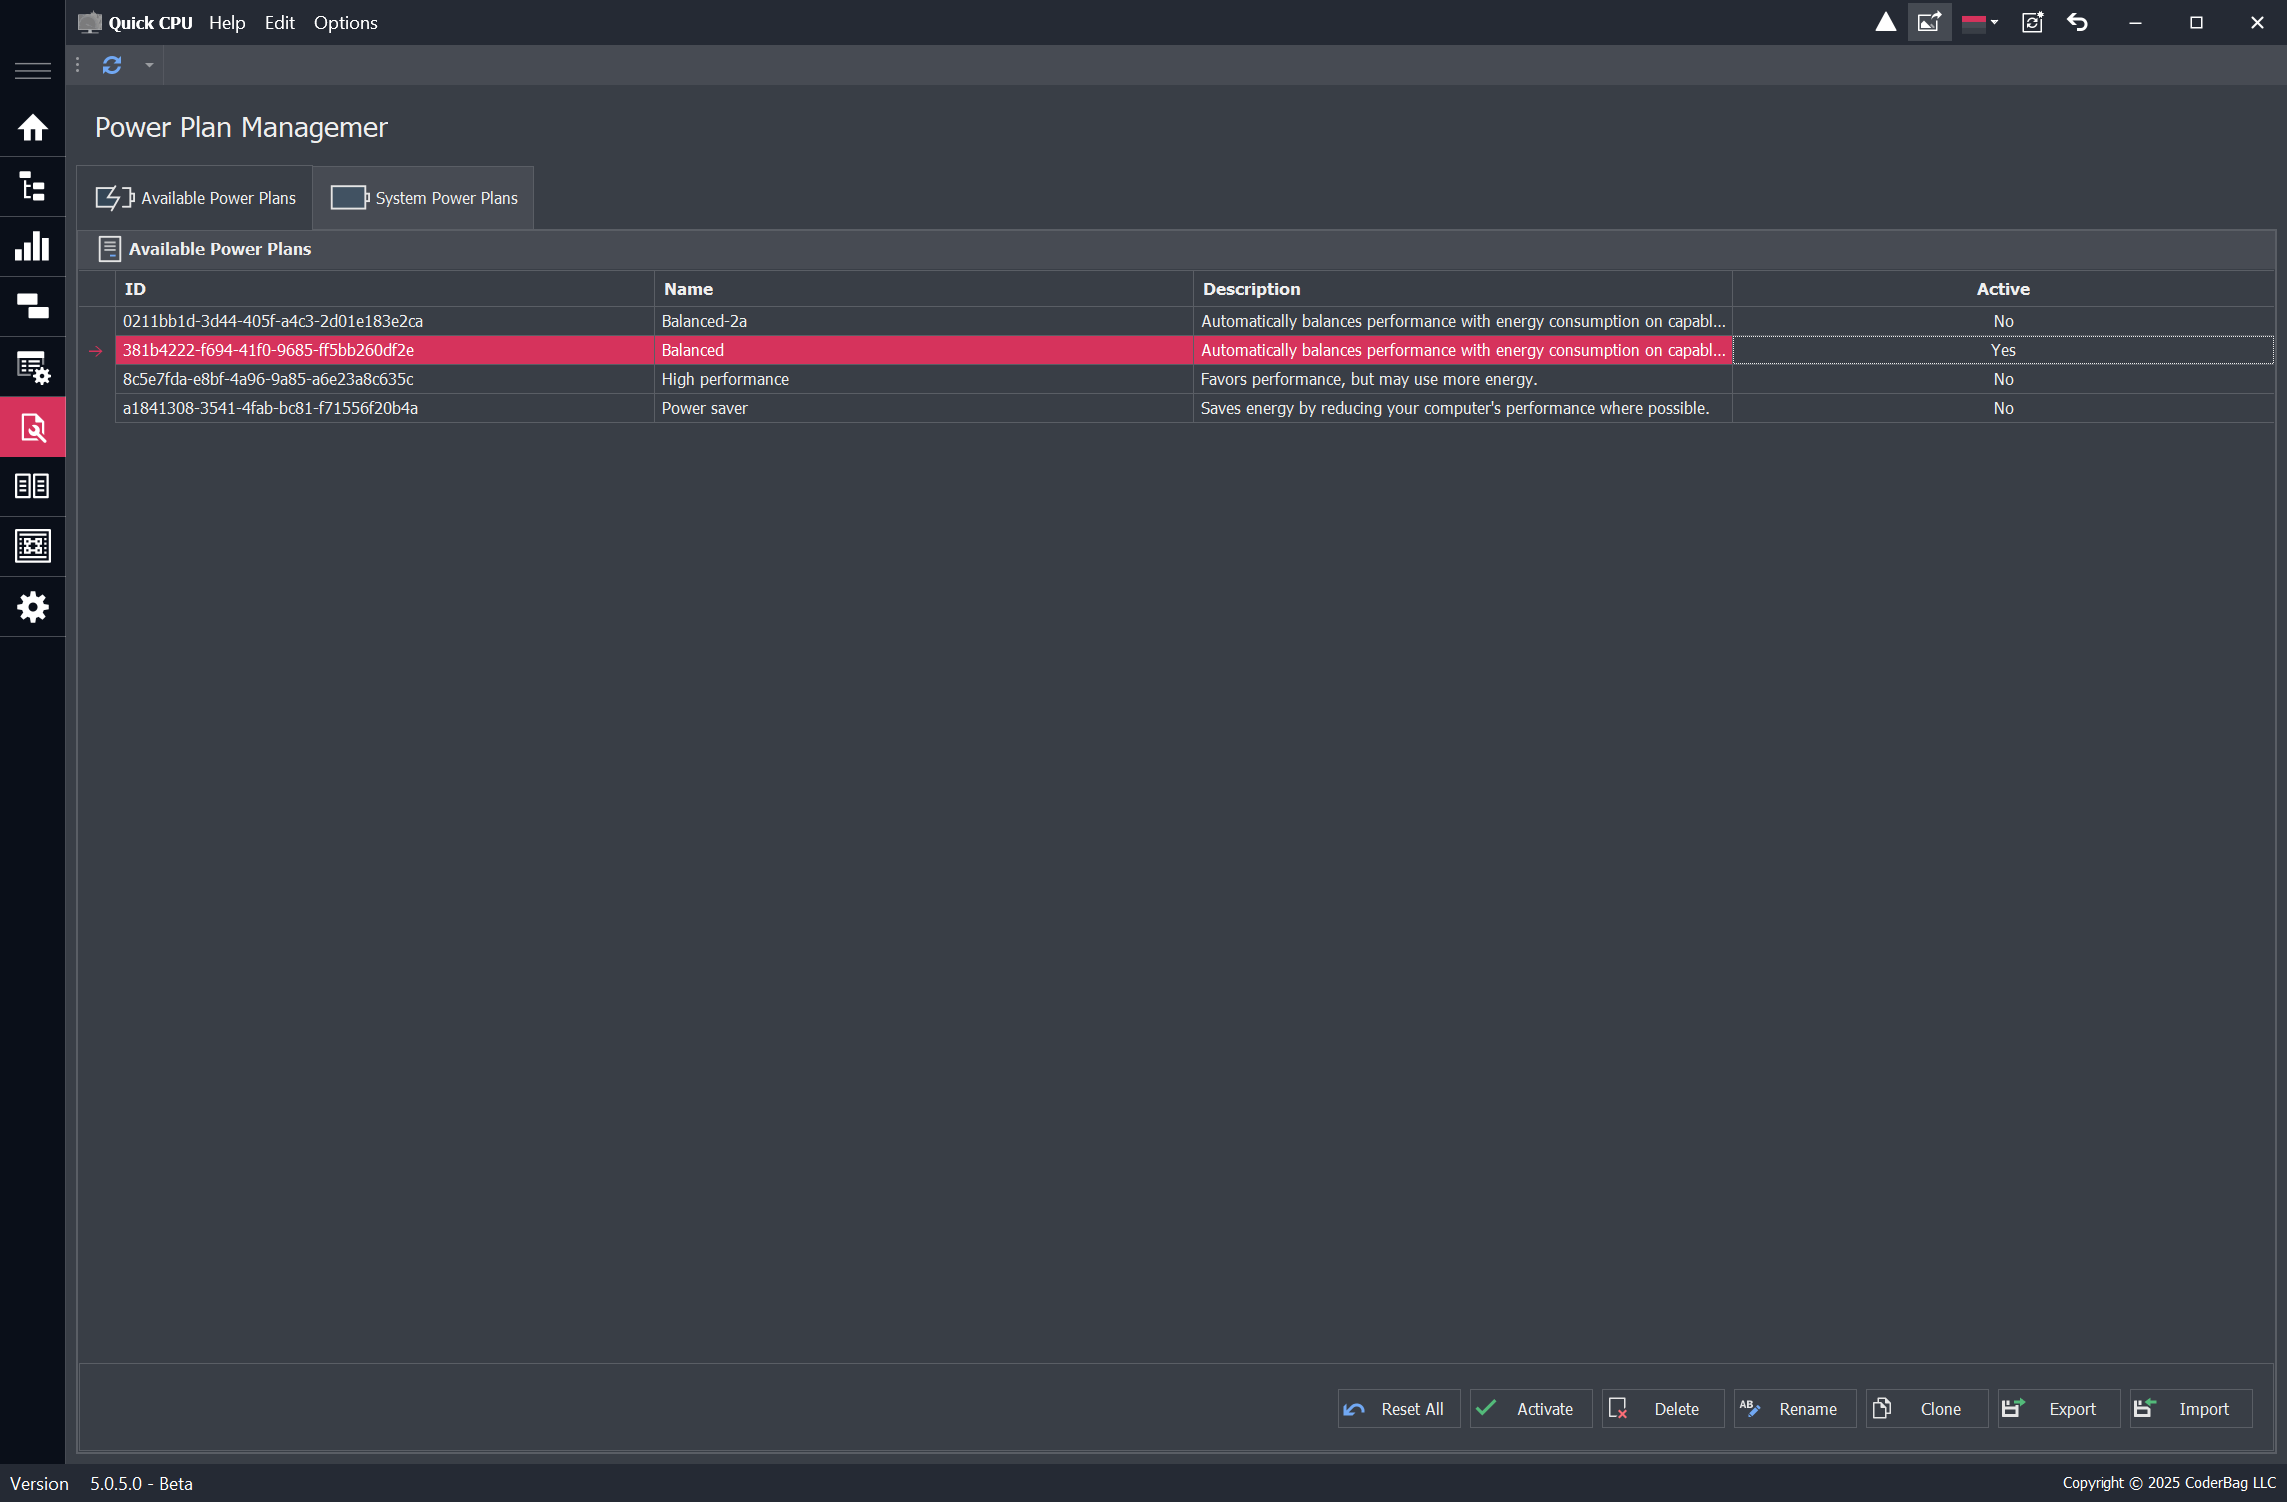
The Power Plan Management control in Quick CPU provides an interface for managing power plans on the system. It consists of two tabs: Available Power Plans and System Power Plans, each offering specific functionalities for modifying, exporting, and installing power plans.
Available Power Plans
This tab displays a list of power plans currently available on the system. Users can select a power plan and perform various actions using the buttons below:
- Reset All: Restores the system's default power plans by removing all custom power plans and resetting settings to default.
- Activate: Sets the selected power plan as the active power profile.
- Delete: Removes the selected power plan. Note: The currently active power plan cannot be deleted unless a different power plan is activated first.
- Rename: Allows renaming the selected power plan and updating its description.
- Clone: Creates a duplicate of the selected power plan.
- Export: Saves the selected power plan as a
.powfile for backup or transfer. - Import: Loads a power plan from a previously exported
.powfile.
System Power Plans
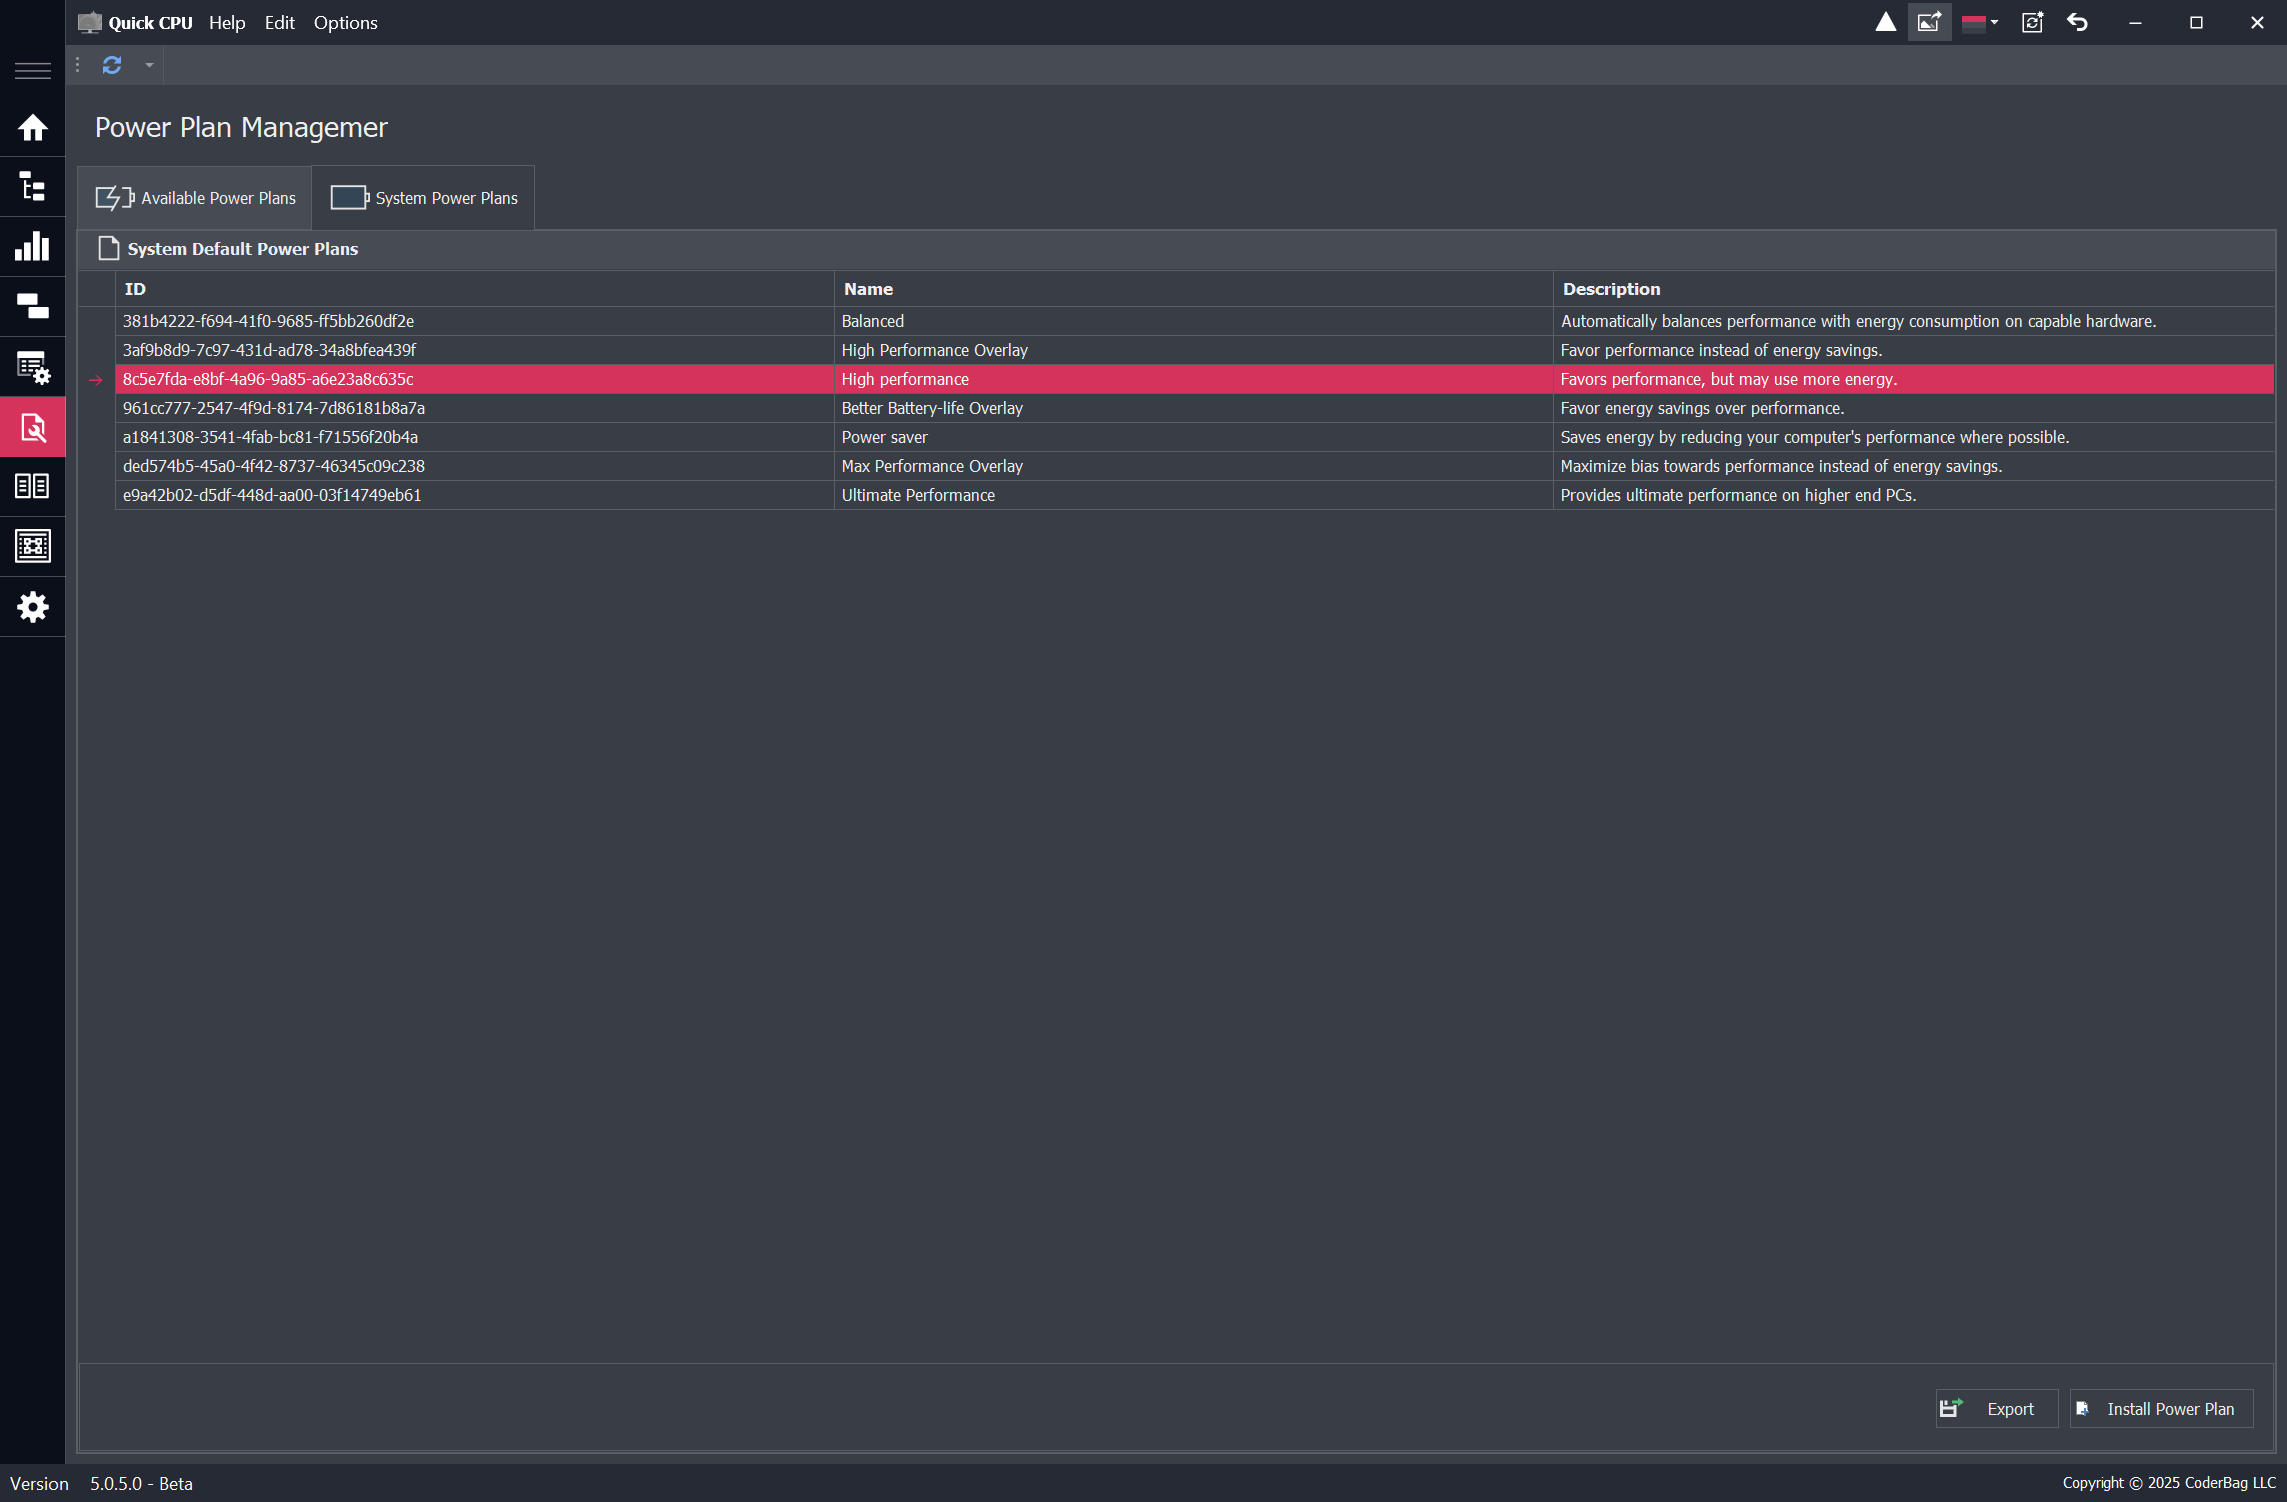
The System Power Plans tab displays all power plans available in the system, including hidden ones such as Overlay Power Plans and Ultimate Performance plans, which are not visible in standard Windows interfaces.
Actions Available
- Export: Allows users to export selected system power plans for backup or sharing.
- Install Power Plan: Enables the installation and activation of hidden or system power plans that are not normally available in the main Quick CPU power plan dropdown.
Usage
This control is useful for advanced power management, allowing users to customize power plans, restore defaults, and enable hidden performance-based power profiles.
Compare Power Plans
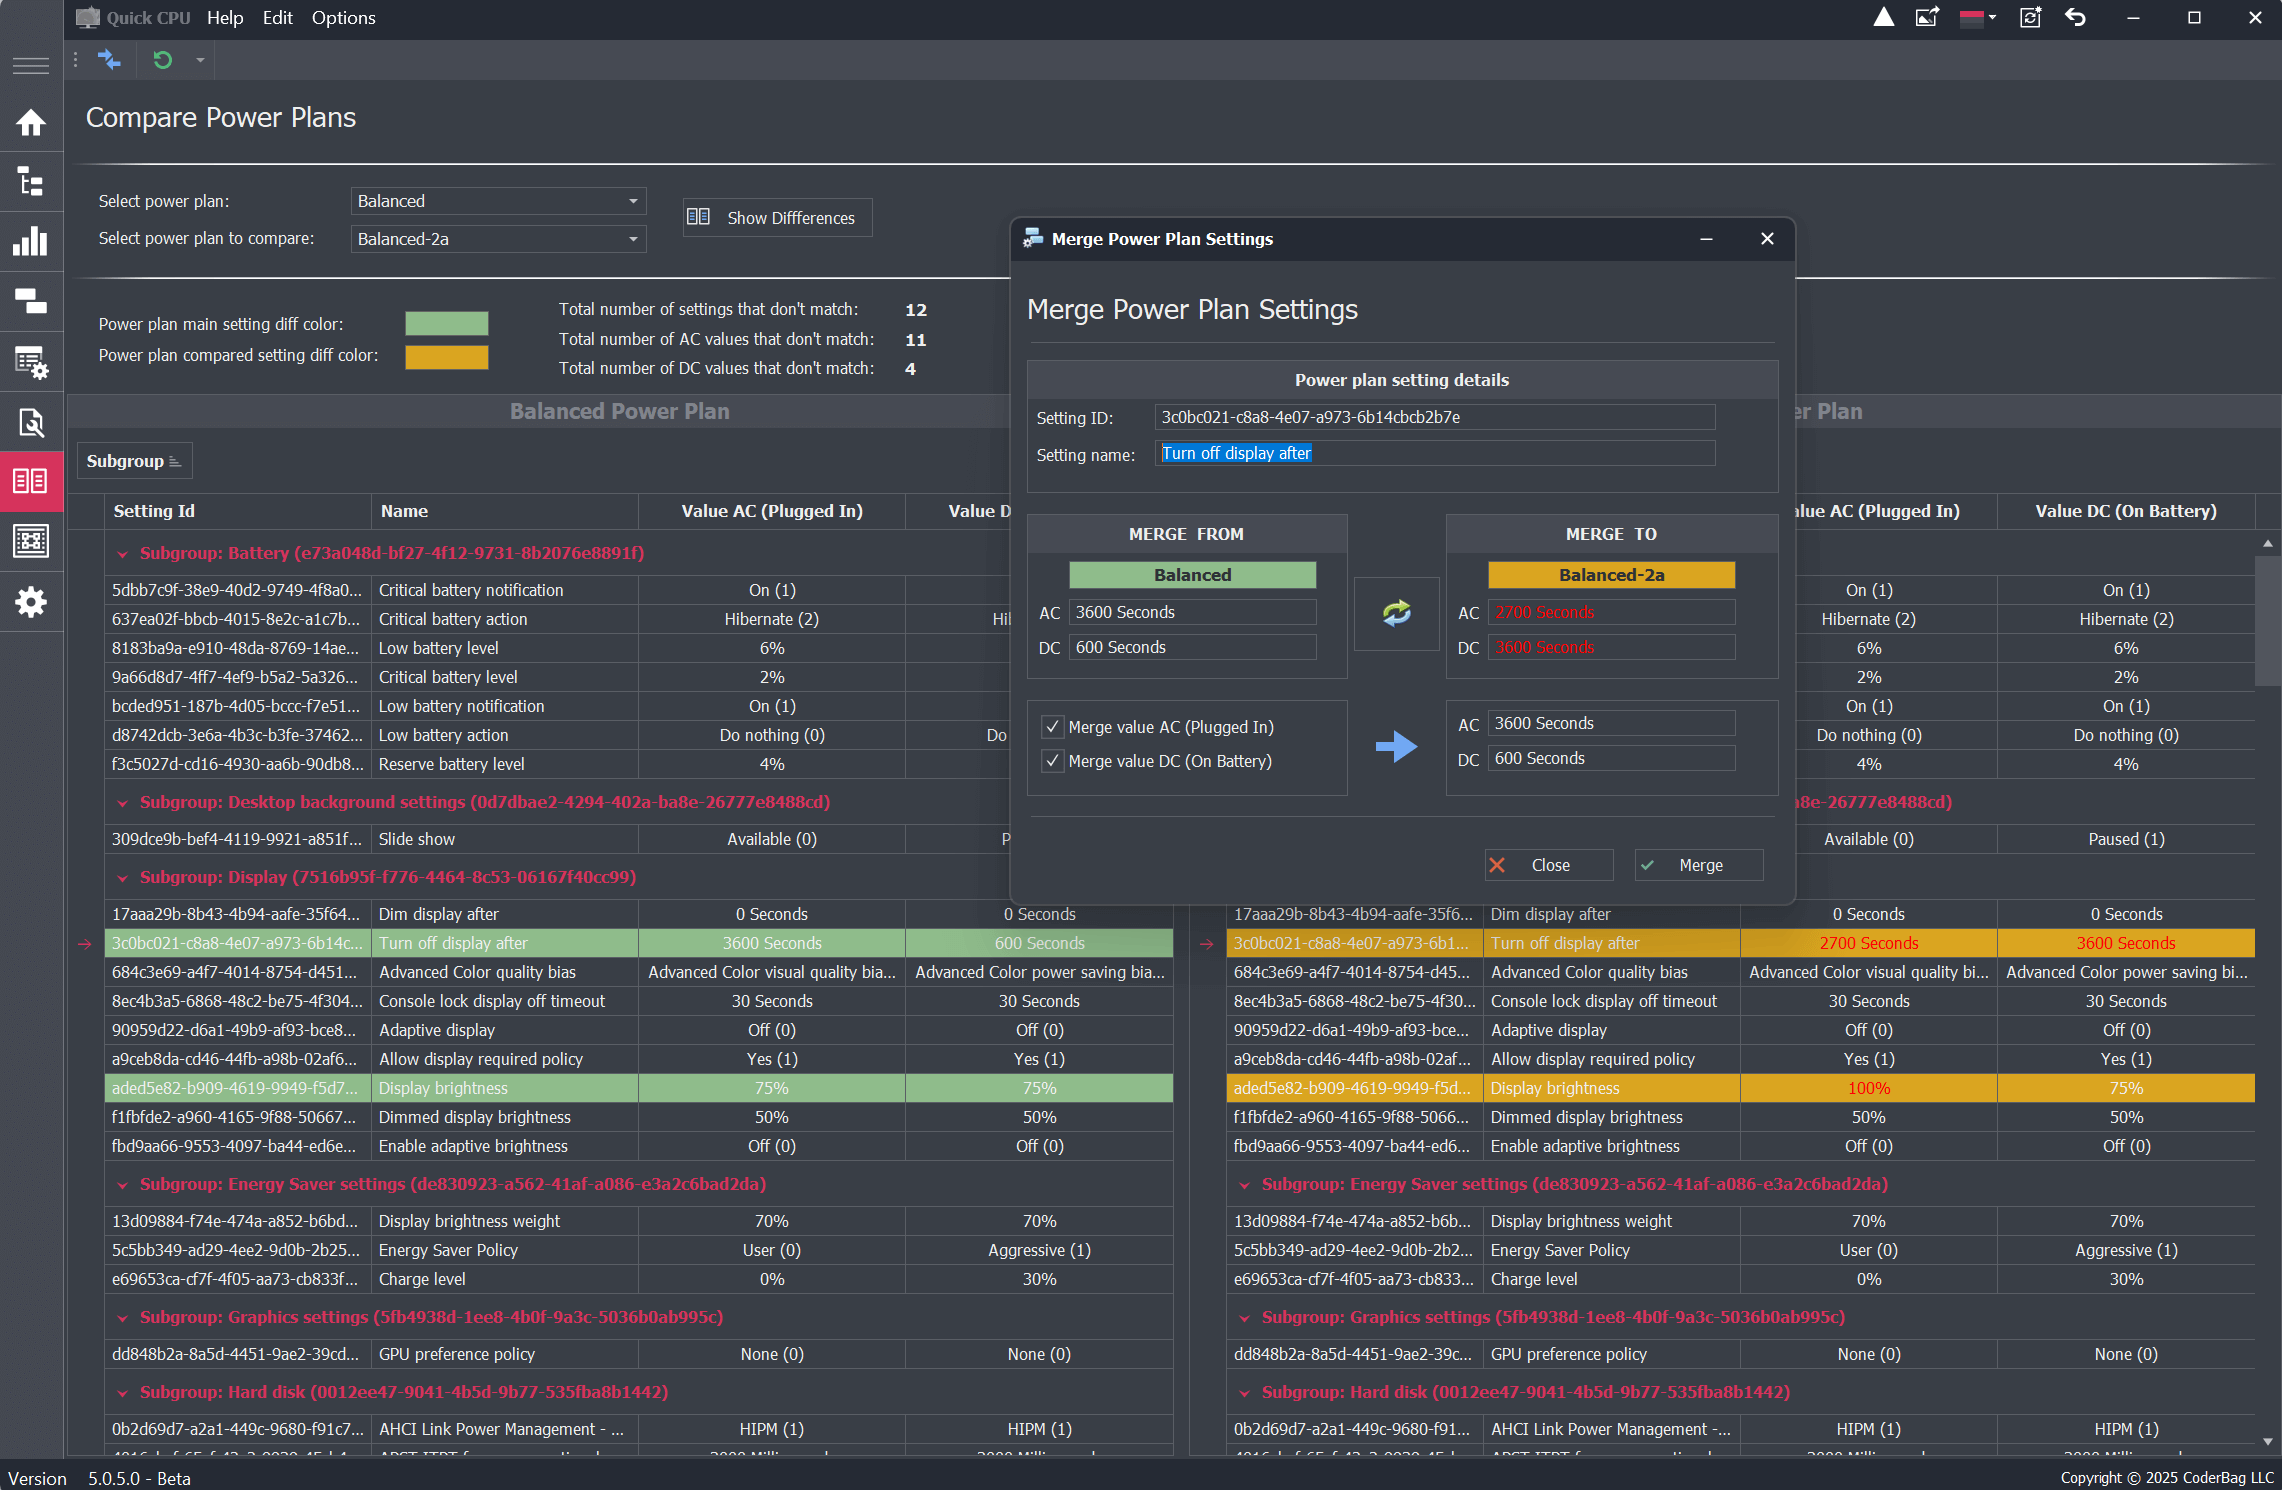
The Compare Power Plans control in Quick CPU allows users to compare settings and values (AC/DC) between two different power plans. It highlights all differences found between the selected power plans and provides an option to merge non-matching settings.
Comparison Overview
When comparing two power plans, the interface provides the following key details:
- Total number of settings that don’t match: Displays the count of power plan settings where AC or DC values are different.
- Total number of AC values that don’t match: Shows the number of settings where the AC (plugged-in) values differ.
- Total number of DC values that don’t match: Shows the number of settings where the DC (on battery) values differ.
Color-Coding of Differences
- Green: Indicates settings that are different but match the selected primary plan.
- Bronze: Highlights non-matching settings between the two compared plans.
Merge Power Plan Settings
The Merge Power Plan Settings dialog allows users to synchronize settings between power plans by merging values from one plan into another.
How to Open the Merge Dialog
Users can access the merge settings dialog using the following methods:
- Double-click on a non-matching setting row (highlighted in green or bronze).
- Right-click a non-matching row and select Merge Settings from the context menu.
- Select a non-matching row and click the Merge Settings button in the bottom-right corner.
Merge Functionality
- Merge From / Merge To: Users can choose the primary power plan (Merge From) and the secondary power plan (Merge To).
- Rotate Button: Allows switching between which power plan is the primary and which is the secondary.
- Check-boxes: Users can select whether to merge one or both values (AC/DC). If a value is already identical in both plans, its checkbox will be disabled.
- Merge Button: Completes the merging process, updating the secondary power plan with the selected values.
Usage
The Compare Power Plans control is useful for identifying inconsistencies between power plans and ensuring settings are aligned according to the user's preferences.
About Our Software
Enhance and monitor system performance, customize favorite settings and more…


